Archive for the ‘crafts’ Category
June 5, 2008

Today we were busy baking and making. With Arnie the Doughnut by Laurie Keller as our inspiration we filled our tummies with yummy doughnuts.

We used 101 Cookbook’s recipe for baked doughnuts. They were (yes we ate the whole 1 1/2 dozen YIKES) delicious. I would like to believe they were healthy since they were baked—but they were dipped in butter and rolled in cinnamon sugar. We were able to make the entire recipe in the food processor. This makes quick time of the kneading (we counted to 45 slowly and it was done).
And so you don’t think we are only about weapons around here, we made felt doughnuts too. My eleven year old was amazing with his needle and his sister was thrilled to have some new play food.
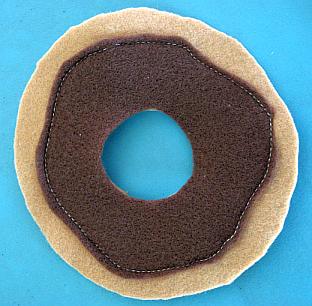
First we cut out our felt circles. You may use our template if you like.
doughnut-template
Sew the frosting to one of the doughnut pieces.
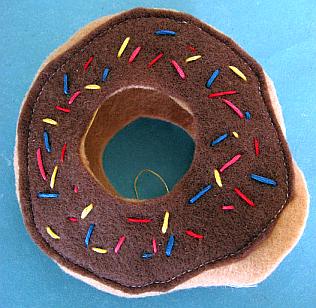
My son then sewed “sprinkles” all over the “frosting” with embroidery thread.

With right sides together sew doughnut pieces together, leaving an opening for turning
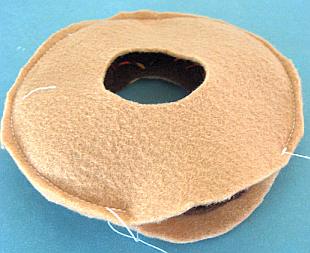
Turn doughnut right side out.
Stitch completely around the center of the doughnut. We found this easiest to do on the sewing machine. Stay as close to the edge as possible, catching the top and bottom layers.
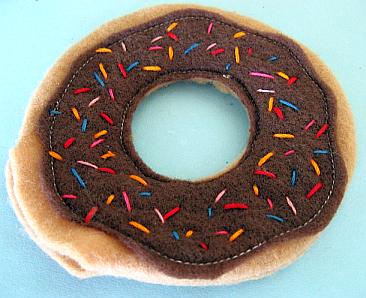
Stuff doughnut and slip stitch dounut closed!

Ta Da!
We hope you will consider reading along with us to Reed to Feed! This funny and superfluous story gave me pause. As we are reading and eating I am reminded of how lucky we are to have an abundance of food. We can “play” with our food. This it not the case for so many. As a world population over 800 million people will go hungry today.
Tags:books, crafts, Doughnut activities, doughnuts, felt, felt doughnut pattern, felt doughnut tutorial, how to make a felt doughnut, how to make baked doughnuts, how to make doughnuts, June 6th National Doughnut Day, kid's crafts and activities, kids books
Posted in children's activities, crafts, kids crafts | 20 Comments »
May 25, 2008
To make this fun and easy marbleized paper you will need: 1/2 tsp alum (helps paint adhere to the paper), 2 cups liquid starch, liquid acrylic paints, a long wooden skewer , a 9 X 13 pan and white copy paper cut to fit the inside your pan. You can change up the size of the pan, just keep the proportions of starch and alum the same. The starch should be 1 to 2 inches deep in your pan.

Pour 2 cups of liquid starch in the pan then add 1/2 tsp alum stirring until mixed.
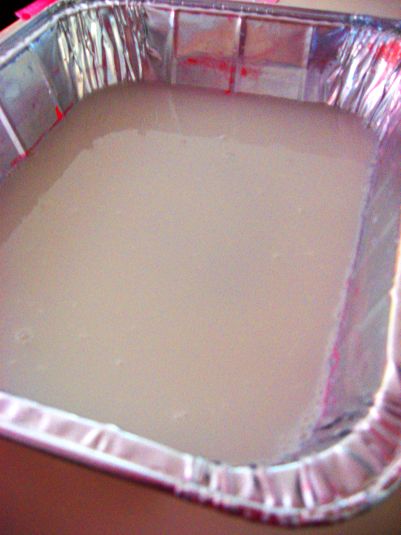
Gently drop acrylic paint on the surface of the starch. Some paint will sink to the bottom- do not worry. Try not to use too much paint. For best results choose light and dark colors that go together. It will take some experimenting to know how much paint works best for you. Brands of acrylic paint differ in consistency. If after several tries you have trouble with the paint not staying on the surface, try adding a drop of water to your paint.

Take the wooden skewer and drag the paint through the starch. Continue dragging the skewer through the paint until you get a design you like. You might try other tools like a fork, feather or comb besides the skewer. Really the fun of this activity is watching the paint swirl around making different designs. There is no right and wrong. Enjoy the experimenting. We were mesmerized —- we hope you will be also!

Lay your piece of paper on top of the starch. Allow it to sit for a couple of seconds.
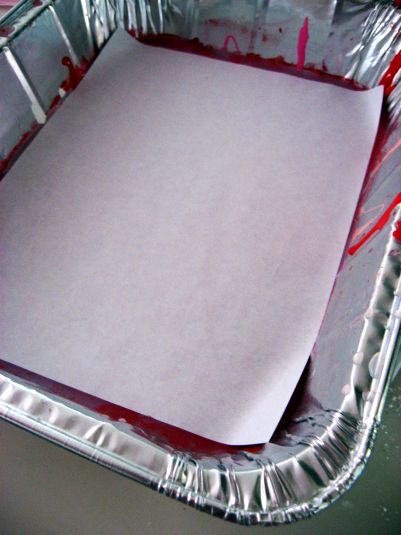
Lift the paper out of the pan and allow the starch to drip off the paper

Rinse the paper under running water removing any extra starch. This does not change the intensity of the colors (the below photo is a different piece of paper paper from the above photo)

After the paper has been rinsed, lay it out to dry. It will take about two hours for the paper to dry. When the paper is completely dry, iron on medium setting until the sheets of paper are flat.
You may find that you can print two sheets of paper before adding more paint to the starch. In the photo below, the bottom piece of paper was made first. We then used our skewer again making a different design and put on another sheet of paper.
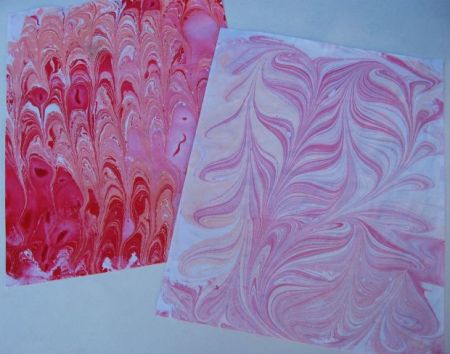
In the photo below we had too much paint on our starch so we went ahead and made a print then changed up the design and then made another. If you feel that you have made a lot of prints and your starch is too full of paint, just pour it out and start again.

The possibilities of what to do with your paper are endless—- cover pencils, a book or a box, make note-cards, book marks or a picture frame etc.
Have fun!
Tags:crafts, how to marbleize paper, kid's crafts and activities, kids crafts, marbelized paper, marbleized paper, marbleizing paper
Posted in children's activities, crafts, handmade gifts, kids, kids crafts | 44 Comments »
May 8, 2008
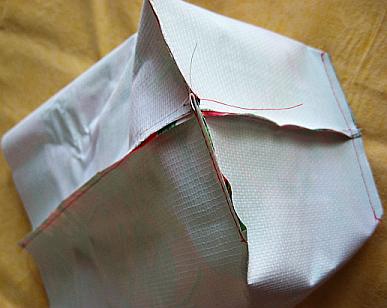
A group of friends and I share a tradition of taking our kids’ teachers lunch during teacher appreciation week. We tally up the amount of lunches we need, notify our teachers and then gather in the morning to assemble the lunches. One friend makes delicious chicken salad, another brings croissants for the sandwiches, one brings fruit, another makes wonderful pasta salad and another awesome brownies. I take care of the packaging. Last year I made these sacks. This year I made oilcloth lunch sacks.

I first made a pattern out of cardboard measuring 15 x 12. Cut a 2 1/2 inch square out of each bottom corner.

Take two pieces of oilcloth right sides together and draw around your template. Cut out. I used small clothes pins to hold the pieces together.

I used pinking shears to cut across the top (very optional- I thought it gave the edge a finished look)

Sew down each side and across the bottom. I used a stitch length of 5 and 1/4 inch seams on the entire bag. My machine handled the oilcloth beautifully, but If you have any troubles, Sew Mama Sew has a wonderful article on sewing with oilcloth.

Fold in bottom of bag bringing bottom seam and side seam together

Pin bag bottom to bag side with clips

Sew across on each side
Turn bag right side out and fold in top of bag about 1/2″ and then top stitch

Measure about 2 1/2 inches from middle side seam on all four corners, finger press, clip with clothes pins

Top-stitch closely to the corner fold on each of the four sides

Finished!
Tags:Add new tag, How to make an oilcloth lunch bag, Lunch bag pattern, Lunch sack pattern, oil cloth, Oil Cloth lunch bag tutorial, Oil Cloth lunch sack tutorial, oilcloth, Oilcloth lunch bag tutorial, Oilcloth lunch sack tutorial, sewing
Posted in crafts, sewing, teacher appreciation, teacher appreciation ideas | 49 Comments »
April 27, 2008
May Day is just a few days away. Here is a little download for a simple cone and gift tag.
may-day-cone-template
Print out on card-stock or decorative paper(my paper was two sided so that is how I got the solid tag and printed cone), roll into a cone shape and then glue. I had pretty good luck with a glue stick (when tiny hands were present) but hot glue is more sturdy. Embellishing the cones with drawings, trims, glitter, stamps, cut-outs, is a great family project————but nothing is more fun than the “ding and dash!”

Tags:Add new tag, free May Day Basket download, May Day, May Day Basket template
Posted in children's activities, crafts, kids crafts, May Day, Uncategorized | 19 Comments »
April 22, 2008
This year for teacher appreciation week we will be giving each teacher a “days of the week” pill box filled with little treats and sayings. I found the pill boxes at the dollar store.


You may download the sayings if you like –
teacher-appreciation-sayings
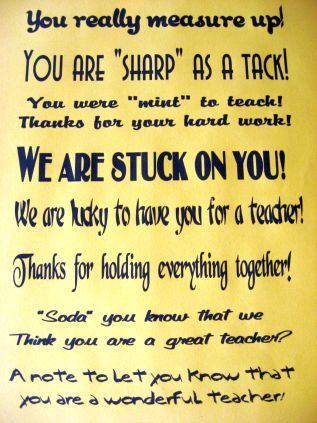
(I didn’t use the “We are lucky to have you for a teacher” saying. It would go nicely with a lottery ticket!)
Fabric covered tacks fill one of the compartments to tell them they are sharp!

I used Jessica Jones’ fabulous instructions to make the fabric covered thumbtacks

Some purchased colorful clips fill the next compartment

Next up marble magnets

These are simple to make with glass gems (floral department at the craft store), E600 craft adhesive, a 3/4 inch hole punch, 3/4 inch magnets and decorative scrapbook paper, wrapping paper and or magazine scraps. First punch out a circle and glue it to the back of the glass gem. I removed air bubbles by moving paper in a circular motion to distribute glue evenly and then pressing hard. Allow to set. Next glue the magnet to the back of your papered gem. I found it necessary to sort my glass gems to find the largest ones with no scratches or imperfections. If your glass gems are smaller try using a 1/2 inch hole punch and 1/2 inch magnets.

A measuring tape tells our teacher that they really measure up

Change for the soda machine fills another compartment

Small little post-it notes (the kind for marking a page) just fit to say, “Just a note to let you know we think you are a wonderful teacher!”

Some mints to say thank you

Wrapped all up with a little gift tag that reads:
A daily gift for all you do,
Teaching my child each day through.
Making a difference without taking a rest,
As a teacher, you’re one of the best!
teacher-appreciation-gift-tag-for-pill-box

Hopefully our teachers will feel appreciated each day!
Tags:fabric covered thumbtacks, marble magnets, teacher appreciation ideas
Posted in children's activities, crafts, free download, free downloads, handmade gifts, kids, kids crafts, teacher appreciation, teacher appreciation ideas, teacher appreciation sayings | 49 Comments »
March 6, 2008
We had so much fun making these window clings —–the possibilities for seasonal and everyday decorations are endless.

You will need a roll of clear contact paper, paint brushes, paint (we used acrylic), fine sandpaper and masking tape.

First cut a piece of contact paper from the roll. I cut squares about 5″ x 5″ because that was about the size of shapes I knew I would be cutting.
Take a fine piece of sandpaper and lightly sand the shiny surface of the contact paper where you will be painting. Wipe off any dust. This step helps the paint adhere to the slick contact paper.
Since we are often VERY messy when we paint I taped a piece of wax paper to the table. Tape the piece of contact paper shiny(sanded) side up onto the wax paper.

Paint onto the contact paper square. Since my daughter is three I encouraged her to paint using lots of colors. I knew I would be cutting out Easter eggs so it really didn’t matter what or how she painted.

Allow the painting to dry completely. I think she painted about 10 of these squares.
Once the paint is completely dry take another square of contact paper the same size as your painting and peel off the paper backing. Cover your painting with the clear contact paper. Smooth out any bubbles.

Trace around any shape of your choosing. I used an egg and bunny for my template.

Cut out the shape

Carefully remove the paper backing. This takes some time —–make sure you are only removing the paper (the back of your painting should be sticky). If you use acrylic paint it is plastic enough that it has a tendency to peel away from the contact paper, so peel carefully! If it does peel away and it won’t stick back down just put a little glue stick between the layers.

Once you are finished stick your silhouettes to your window

from the outside looking in
from the inside looking out

I would encourage older kids to paint their own designs and then cut out. I can imagine huge flowers and birds! Nothing is sweeter than kid’s art!
Have fun!!
Posted in children's activities, crafts, decorations, Easter, free download, free downloads, holiday decorations, kids, kids crafts | 37 Comments »
March 4, 2008
My 11 year old boy made these cool hanging felt shamrocks for our window. (He wanted me to make sure that you know he was VERY bored and needed something to do and he got to use the sewing machine —stressing the MACHINE part, so it was all good)

We took two layers of felt and cut out a shamrock shape. My crafty boy used a sewing machine to beautifully stitch the layers together and also stiched in a ribbon at the top. He added a few beads on the ribbon and now they our hanging in our window—hopefully bringing us lots of luck! If you need some luck, here are the shamrock shapes we used.
Posted in children's activities, clover template, crafts, free download, free shamrock pattern, holiday decorations, kids, kids crafts, party decorations, printable shamrock, sewing, St Patrick's Day | 12 Comments »
February 14, 2008
My little girl couldn’t take any extra treats, candy or trinkets with her Valentines for preschool. That meant the lollipop lilies were out for us. So instead we made these little conversation heart garlands out of cardstock.

We added “pink fairy” glitter (carefully chosen and liberally sprinkled by my daughter) to each of the letters. I used a Fiskers 1/4 inch rectangle hole punch to punch a hole in each side and then strung the letters on a 1/4 inch ribbon. We included two mini clothes pins with each garland. We packaged each garland in a clear cellophane bag tied with a ribbon.
BE MINE Conversation Heart Garland
I LUV U 4 EVER Conversation Heart Garland
Wishing you a very happy Valentine’s Day!
Posted in children's activities, crafts, decorations, free downloads, free valentines, holiday decorations, homemade valentines, kids, kids crafts, party decorations, valentine's day crafts, valentines | 15 Comments »
February 12, 2008
Here is our solution for Valentines for a boy that couldn’t decide whether Valentines are still “cool” to pass out. (He is in the fifth grade)

This boy’s indecision pushed us into a last minute project last night that I am still trying to finish today.

So if you find yourself in the same spot you can download the COOL Whirly Gig. We used card-stock, but they worked on thinner paper also. My son finally getting into the fun decided we should punch a hole in the bottom and tie on a piece of candy (YIKES)!

Cut on all solid lines and fold on the dotted lines.

Fold up bottom flap and if you are not tying on candy you can fasten with a paper clip (wish I had a cool shaped one) , staple or cute heart brad. Since the party is an hour away I think I might just hot glue that candy on the bottom!
Toss up into the air and it will twirl to the ground! I hope you enjoy! I am off to the Valentine’s Day party.
Posted in children's activities, crafts, free downloads, free valentines, homemade valentines, kids, kids crafts, valentine's day crafts, valentines | 6 Comments »
February 8, 2008

Here is another free valentine download for you! This one is much simpler! Download the files, cut and assemble!

Lollipop Lily
Leaf

Posted in children's activities, crafts, free downloads, free valentines, homemade valentines, kids, kids crafts, party favors, valentine's day crafts, valentines | 35 Comments »
February 6, 2008
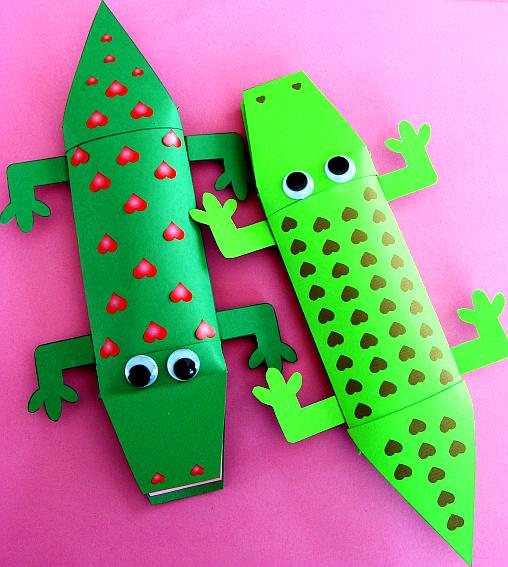
Here is a free Valentine download for you if you dare (lots of cutting, folding, gluing….)

First download and print out an alligator and inside of mouth

Cut out pieces

Lightly score lines on pillow box and gently fold

Put glue on side flap of pillow box and fold together, leaving the ends open. Allow to dry a few minutes before folding in the ends of the box.

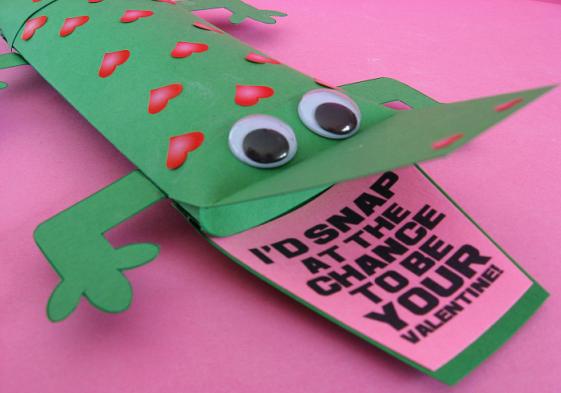
Score about 1/2 inch from the end of the upper mouth piece so it can open and close (see final picture). Fold in ends on box and begin gluing on upper and lower mouth and the tail.Use lots of glue stick! Use a rubber band to secure pieces while they are drying.

Fold edge of each leg and glue to sides of box

Add some googly eyes and fill box with candy

Posted in children's activities, crafts, free downloads, free valentines, homemade valentines, kids, kids crafts, party favors, valentine's day crafts, valentines | 35 Comments »
February 3, 2008

Take a little tuna fish can and cover it with spray paint and paper. Hot glue plastic pony beads all the way around the side and run a yarn through the beads and you have a little drum. Be sure to use a safety can opener so that there are no sharp edges and the top of the can works as a lid. I think it would be best to package the candy in little clear bags so the candy doesn’t take on any odd tastes from the can.

Small olive and green chili cans would make cute little drums. You could also forget the beads and yarn and use glitter and other embellishments instead!
Posted in children's activities, crafts, homemade valentines, kids, kids crafts, party favors, valentine's day crafts, valentines | 10 Comments »
January 18, 2008
Our pal Elle came today and she made the most adorable stuffed butterfly and “puppy.”

These fabric crayons are great to have on hand to pull out when a quick and entertaining crafted is needed. You can use regular crayons directly on fabric but I really like using the paper. I think it is much less intimidating for children.

First Elle colored these pictures on plain white paper. You need to color hard. Keep the drawing large with simple edges. It is important to color on only ONE side of the paper. If your child feels that she made a “mistake” give them another sheet. Our “mistakes” bled through when we ironed. Remind them that their drawings will be reversed so they must write backwards if they are using letters.

Iron the drawings onto synthetic or poly/cotton blended fabric (I think my colors would have been more vibrant if I had done this, but I only had white muslin on hand) by placing the drawing face down on right side of fabric . Sandwich a layer of plain white paper on the top and on the bottom to keep from leaving crayon on your iron and ironing board. With iron on cotton setting, iron over design until the image is seen through the back of the paper.
Place the design onto another piece of fabric right sides together and stitch around the design, leaving a small opening for the stuffing. I think this is much easier than cutting out the design and then sewing.

Cut out the creatures, clip all corners and curves

Turn inside out and stuff

Slip stitch the opening closed and you have some wonderful creations.

Posted in children's activities, crafts, fabric crayons, handmade gifts, handmade stuffed animals, kids, kids crafts, sewing, Uncategorized | 22 Comments »
December 20, 2007
Since our oldest son was a toddler we have had friends come over IN THEIR PAJAMAS to read Christmas stories. Our oldest son is now 15 and this has become one of our most loved holiday traditions.
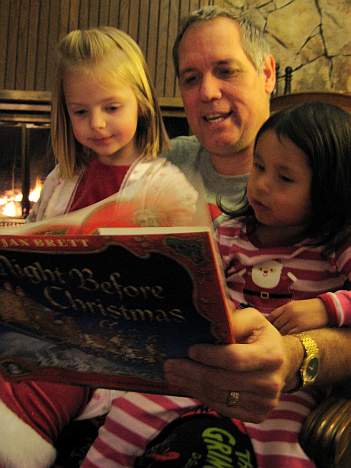
There are no fancy clothes or fancy food and kids are definitely invited. At first the guests (especially the adults) might be shy about wearing their pajamas—but we insist. We sit around reading Christmas stories, drinking hot chocolate, sometimes we do a craft(decorating gingerbread houses and making gift tags are a favorite), and we eat a few simple snacks. It is such a special way to spend a cozy and relaxing evening with friends. We enjoy listening to our friends favorite Christmas books and as some of the children have gotten older they enjoy reading the stories also. I can’t say enough about how special the evening is for us. It is a moment in this busy time of year to slow down and remember what the Season is about!
When we moved to Germany I met my dear friend Wendy who was also having these parties. Her sister Tara has written some wonderful invitations. I “borrow” these poems and then make a theme around the invite. This is one of my favorite, The Polar Express.
We would like for you to join us for
a Christmas tale
We’ll gather for a story about a
little sleigh bell
We’ll be in our pajamas so that’s
how you should dress
All aboard headed north on the
Polar Express
Your time and date
Please bring your favorite Christmas
story to read!
Invitations can be made by layering holiday papers and adding a jingle bell at the top

The best thing is we can always elaborate on the theme and change it up. Next time I use this I want to make jingle bell wreaths. Family Fun has cute jingle bell bracelets to make. The possibilities are endless. Party favors would be cute sent home in a bag clipped with this jingle bell clip.
So warm up some hot chocolate and invite some friends over and relax and enjoy some special family time. A sweet little 4 year old said it was the best party she had ever been to. Now that is a pretty good endorsement when you have been to a “princess” party before!
Posted in children's activities, Christmas, Christmas parties, crafts, decorations, kids, party favors, party ideas | 10 Comments »
November 29, 2007
I made this hooded towel for Christmas for my little girl. It is a really simple and quick project made from 1 bath towel and 1/2 of a hand towel.
Cut your hand towel in half
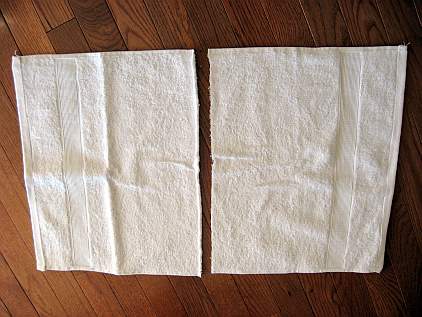
Fold over the finished edge of the hand towel. I folded down just past the ribbing. You want to have about 10 1/2 inches in finished length. Stitch down the edge.

I stitched a little ric -rac to the front.

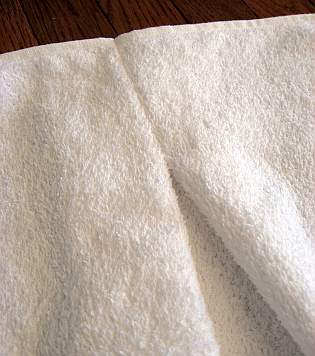
Fold hand towel in half right sides together, find the middle of the side and mark with a pin.
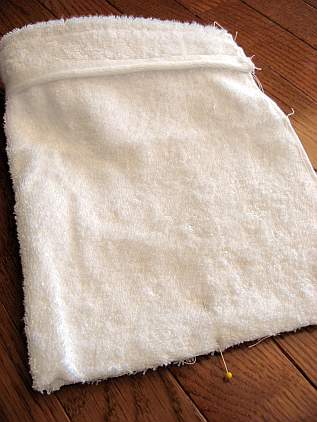
Bring the folded edge into the middle. You may have to remove the pin while you adjust the towel.
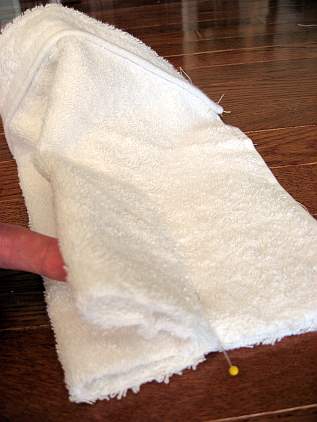
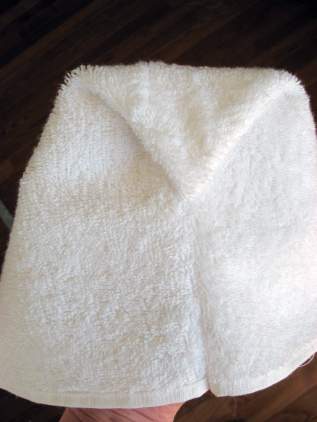
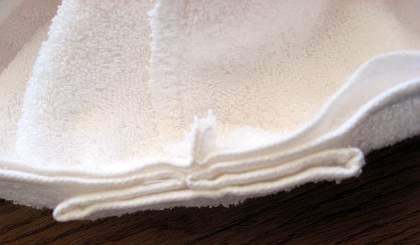
Stitch across the bottom edge making sure you catch all layers of the pleat. When finished stitching, zig zag or overcast your seam to prevent raveling. When you are finished the right side will look like this.
Fold the bath towel in half, right sides together.
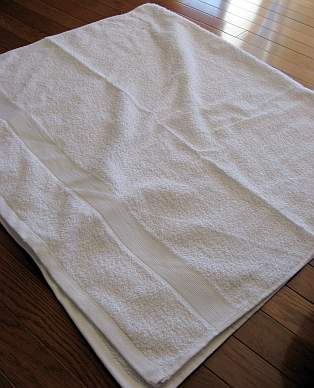
Measure over 3-4 inches from the fold and 3-4 inches down from the top and stitch.

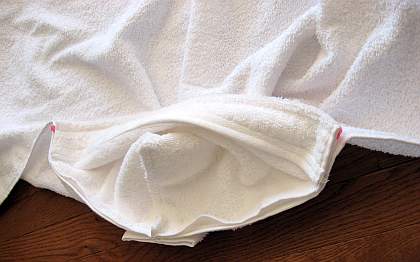
Open bath towel flat and open and flatten the tuck. You can baste across the tuck if you want.
The front of the bath towel will look like this when finished
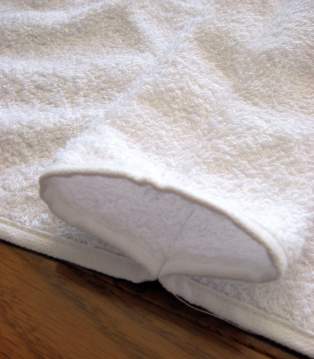
With right sides together, line up center of bath towel and center of hood.
Pin hood to bath towel. You will stitch from the side edge of the hood across to the other side. Be sure to back stitch when starting and stopping to reinforce the seam. I stitched close to the edge along the inside of the towel’s finished edge. (I have not stitched in the following photo)
The finished towel looks like this
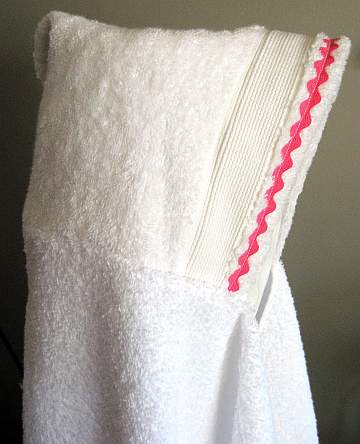
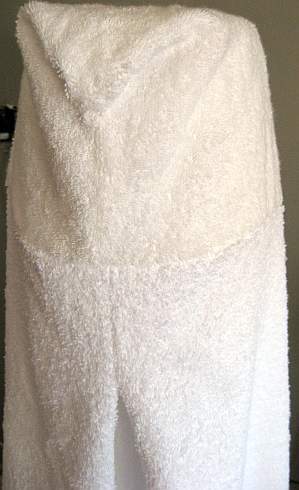
Now that it is finished I am wishing I had added another row of ric- rac or that I could find the darling pink towel with rainbow ribbing I originally purchased for this project!
Posted in crafts, handmade gifts, sewing | 28 Comments »
October 2, 2007

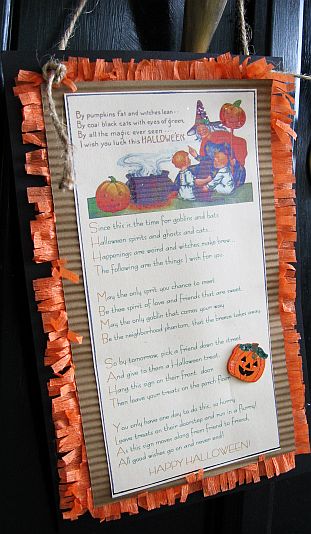
Here it is, a Booing Poem Download. After many years I have decided this is the simplest way to Boo my friends. There is no need for them to make photocopies. Your friends just fill the cone with goodies and pass it from friend to friend. Now, there is one big problem——-those friends who refuse to pass the cone along because they want to keep it (you know who you are– hehe). I usually make about 5 cones to get everyone started and hope somebody passes one along.
I made a large cone out of black posterboard. I printed the poem on cardstock. I cut it out and glued a ruffle of orange crepe paper to the back. I backed the whole thing with a piece of poster board to make it more rigid. I hot glued the poem to the front of the cone. I embellished the top of the cone with a paper fringe I purchased at Hobby Lobby. I painted polka dots over the cone and added a touch of glitter here and there. I wrapped wire around a large dowel to make a curly handle and then attached it to the top of the cone. These are all just ideas for inspiration. You can make these cones however you want and with whatever supplies you have. You can also include a ghost cut-out if you want them to have something to hang in their window. It might be cute to hang a bunch of ghosts from the bottom of the cone so everyone can take one.
If you would like the Booing Poem with black letters you can download this version.
Please let me know if you are not able to download the poem. Here it is if you would like to copy and paste.
Since this is the time for goblins and bats
Halloween spirits and ghosts and cats
Happenings are weird and witches make brew
The following are the things I wish for you.
May the only spirit you chance to meet
Be thee spirit of love and friends that are sweet.
May the only goblin that comes your way
Be the neighborhood phantom, the breeze takes away.
So by tomorrow, pick a friend down the street
And give to them a Halloween treat.
Fill this cone with goodies galore,
Then hang it on their front door.
You only have one day to do this, so hurry
Leave treats on their door and run in a flurry
As this cone moves along from friend to friend,
All good wishes go on and never end
HAPPY HALLOWEEN
I have also made a sign instead of a cone.

I layered black cardstock, then a piece of brown paper sent through the crimper with some crepe paper fringe taped to the back, then the poem copied on cardstock. Punch two holes at the top and run a cord through the holes for hanging. I embellished the sign with a little glitter and a wooden pumpkin.
Boo Sign Download
Boo Sign Download with black letters
Posted in children's activities, crafts, Halloween, holiday decorations, kids crafts | 64 Comments »
September 5, 2007
You can scamper on over to Anna Maria Horner and get yourself some Puppy Love. She has a free download for this darling puppy applique.


To make this tote I cut 2 pieces 12″ X 14″ , 2 lining pieces 12″ X 14″ , 1 piece sew-in interfacing 12″X14″ , 1 piece for strap 8″ X 4″ (I used lining fabric for this), 1 piece for strap 24″ X 4″. First I printed out the puppy applique. Using Anna’s instructions I cut out the puppy using black faux suede. Place the front piece of fabric over the piece of interfacing, position the puppy on the right side of fabric. I sewed around the entire puppy with a machine blanket stitch. I attached a bow for the puppy’s collar. To make your straps fold fabric in half, press, then open flat. Fold each edge into the center, press, then fold in half. Stitch close to the edge down each side of strap. The bag goes together using Colorfool’s Tote Tutorial. I used a 1/2″ seam allowance on my tote. Notice I used two different sized straps. The shorter strap fits around the larger strap. The shorter strap keeps the bag closed while you carry the tote with the longer strap. When attaching the straps, place the shorter strap two inches in from each side edge on the back side of the tote (I made raw edge (end) of straps flush with raw edge of tote –on the tutorial they look like they stick out about an inch). Each end of the longer strap is placed three inches over from each side edge of the front of the tote.
This tote is for Elle, the most puppy loving little girl we know!
Posted in crafts, sewing | 6 Comments »


