Archive for the ‘homemade valentines’ Category
February 14, 2008
My little girl couldn’t take any extra treats, candy or trinkets with her Valentines for preschool. That meant the lollipop lilies were out for us. So instead we made these little conversation heart garlands out of cardstock.

We added “pink fairy” glitter (carefully chosen and liberally sprinkled by my daughter) to each of the letters. I used a Fiskers 1/4 inch rectangle hole punch to punch a hole in each side and then strung the letters on a 1/4 inch ribbon. We included two mini clothes pins with each garland. We packaged each garland in a clear cellophane bag tied with a ribbon.
BE MINE Conversation Heart Garland
I LUV U 4 EVER Conversation Heart Garland
Wishing you a very happy Valentine’s Day!
Posted in children's activities, crafts, decorations, free downloads, free valentines, holiday decorations, homemade valentines, kids, kids crafts, party decorations, valentine's day crafts, valentines | 15 Comments »
February 12, 2008
Here is our solution for Valentines for a boy that couldn’t decide whether Valentines are still “cool” to pass out. (He is in the fifth grade)

This boy’s indecision pushed us into a last minute project last night that I am still trying to finish today.

So if you find yourself in the same spot you can download the COOL Whirly Gig. We used card-stock, but they worked on thinner paper also. My son finally getting into the fun decided we should punch a hole in the bottom and tie on a piece of candy (YIKES)!

Cut on all solid lines and fold on the dotted lines.

Fold up bottom flap and if you are not tying on candy you can fasten with a paper clip (wish I had a cool shaped one) , staple or cute heart brad. Since the party is an hour away I think I might just hot glue that candy on the bottom!
Toss up into the air and it will twirl to the ground! I hope you enjoy! I am off to the Valentine’s Day party.
Posted in children's activities, crafts, free downloads, free valentines, homemade valentines, kids, kids crafts, valentine's day crafts, valentines | 6 Comments »
February 8, 2008

Here is another free valentine download for you! This one is much simpler! Download the files, cut and assemble!

Lollipop Lily
Leaf

Posted in children's activities, crafts, free downloads, free valentines, homemade valentines, kids, kids crafts, party favors, valentine's day crafts, valentines | 35 Comments »
February 6, 2008
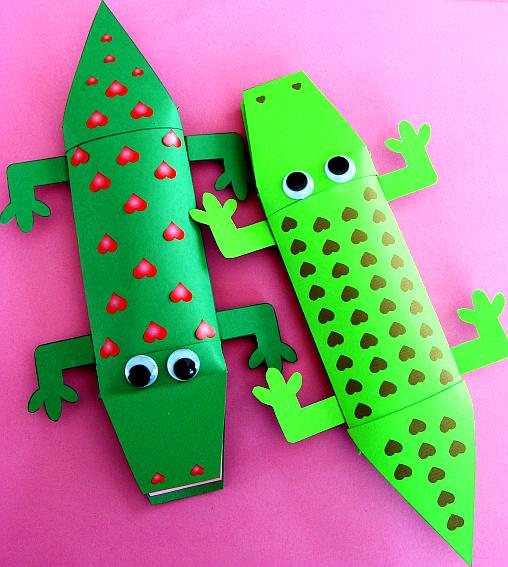
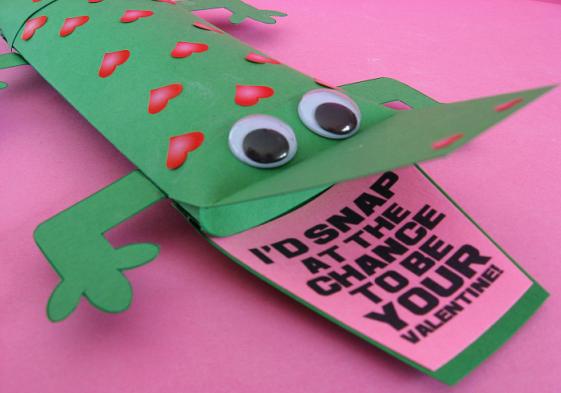
Here is a free Valentine download for you if you dare (lots of cutting, folding, gluing….)

First download and print out an alligator and inside of mouth

Cut out pieces

Lightly score lines on pillow box and gently fold

Put glue on side flap of pillow box and fold together, leaving the ends open. Allow to dry a few minutes before folding in the ends of the box.

Score about 1/2 inch from the end of the upper mouth piece so it can open and close (see final picture). Fold in ends on box and begin gluing on upper and lower mouth and the tail.Use lots of glue stick! Use a rubber band to secure pieces while they are drying.

Fold edge of each leg and glue to sides of box

Add some googly eyes and fill box with candy

Posted in children's activities, crafts, free downloads, free valentines, homemade valentines, kids, kids crafts, party favors, valentine's day crafts, valentines | 35 Comments »
February 3, 2008
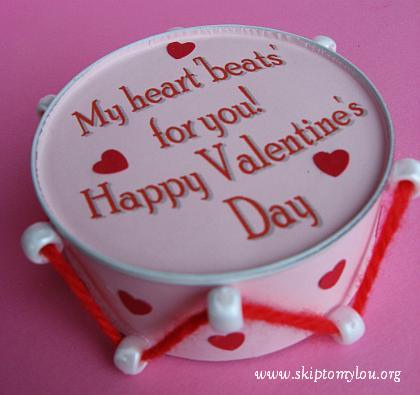
Take a little tuna fish can and cover it with spray paint and paper. Hot glue plastic pony beads all the way around the side and run a yarn through the beads and you have a little drum. Be sure to use a safety can opener so that there are no sharp edges and the top of the can works as a lid. I think it would be best to package the candy in little clear bags so the candy doesn’t take on any odd tastes from the can.

Small olive and green chili cans would make cute little drums. You could also forget the beads and yarn and use glitter and other embellishments instead!
Posted in children's activities, crafts, homemade valentines, kids, kids crafts, party favors, valentine's day crafts, valentines | 10 Comments »
February 9, 2007
It is really cold around here and they say snow is on the way. We thought our front door needed this.

To make this doormat you need a carpet sample , ours were free from our local store. Since we repeat this craft all year round he knows us! He didn’t have the rectangle size (or texture free) we like so these square ones had to do. It is best to try to get the regular pile-not Berber, shag or textured carpet.
We made our own stamps by cutting shapes out of foam sheets and rubber cementing them to a bock of wood.

Each stamp needs two layers of foam, so be sure to cut two for each stamp you make. Once you have the foam shape glued to the wood, put something heavy and flat on top of your stamp while the glue dries. This keeps the foam from curling.

We paint (we use acrylic) the paint on the stamps with a foam brush. This is easier than dipping and keeps the area around the stamp clean—which is very important. Use a lot of paint.

This is probably the only time that rocking and jiggling your stamp is okay. You are trying to work the paint into the carpet. I suggest asking for one extra carpet sample and give a few practice runs to get the feel of the amount of paint, pressure and jiggling you need to do. Kids love to use both hands and press really hard (an important reason you want to keep the surrounding wood of the stamp paint free). An adult probably needs to give the stamp a final press –depending on the age of the child.

If your print comes off light, simply take your foam brush and work a bit more paint in those areas.

Once you are finished the stamps can be rinsed off with water. Allow them to dry completely before storing.
If you don’t want to make your own stamps you can always use the large foam die-cut sponges found at craft stores. Make sure to dampen your sponge and then dip into paint. You will find an especially nice selection of these sponges around Halloween.
I have asked for 25 carpet samples at one time (give the carpet store some notice so they can collect them for you) so we could do this for the craft at a holiday party at school with 1st and 5th graders. It actually worked out beautifully. I was able to die-cut the shapes out of foam so I had plenty without me having to cut them all . I had parents each with their own stamp and color of paint and walk around the room allowing the children (who stayed at their desks) to stamp their carpets. The parents would paint the stamp each time. We set the carpets out in the hallway to dry. We did this at the very beginning of the party so they had time to dry before heading home (on the buses -oh my I am sure I was popular with those drivers that day!).

Posted in children's activities, crafts, holiday decorations, homemade valentines, valentine's day crafts, valentines | 6 Comments »
February 5, 2007
My son wants to have some friends over to decorate some cookies for Valentine’s day. I was trying to figure out something crafty to go along with the cookie decorating so we will also decorate some cards. Here goes the very basic how to. I will leave the embellishment with glitter, stamps, stickers, ribbon and doilies to you and the boys. However, I will warn you that this little party has very little to do with crafts and decorating but rather the FOOD —they are 10. I will show you the final results later but if they look too crafty—like they really enjoyed this, I will have to block out their heads because they would not want anyone to know that they still like crafts. If they don’t turn out we will know what I suspected all along was true — it is all about the food!
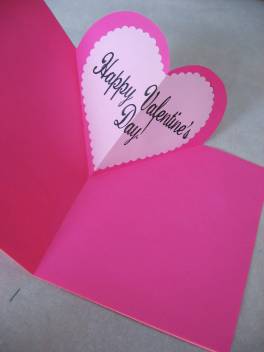
You will need regular weight copy paper and card-stock to make these cards. First fold the regular weight copy paper in half.

Cut out a space 2 1/2 inches over and 2 inches down from the upper right corner.

Fold the left edge over as shown in the picture.

Cut the top part away as shown. You might want to practice on scrap paper until you get the heart shape you are happy with.

Fold the heart to the center.

Cut two inches off of the long side of a piece of card-stock. Fold the larger piece in half.

Place your heart card into the card-stock and glue everything but the heart shape.

Decorate the front

Decorate the inside. When you open the card the heart pops up.
Posted in children's activities, crafts, homemade valentines, kids crafts, party ideas, valentine's day crafts, valentines | 12 Comments »
February 2, 2007
Crayon shavings melted between wax paper and then cut into hearts make a beautiful display in windows. This is an oldie but goodie craft that we love. Here are ours made with lots of kid help! I can’t think of anything more cheerful or happy hanging from a window.

We made lots of crayon shavings with a pencil sharpener.

Place shavings on a piece of wax paper.

Either place another piece of wax paper on top or fold over the edge to cover all of the shavings.

Iron on the lowest setting for about 1 second. You can go always go longer after checking to see if the shavings have melted. Be careful to not burn the wax paper. It is a good idea to do the ironing on a piece of newspaper. Some shavings could leak out of the sides and it does leave a residue underneath the wax paper. If you are worried about your iron, just place your wax paper between two sheets of newspaper or scrap paper.


I think it is easiest for kids to trace around cardboard so I took cereal boxes and cut out heart shapes to be used for patterns. This is where you get variety so let the kids draw the hearts.

Draw around your pattern.

Cut out, hole punch and tie on ribbon, thread or fishing line. Hang!

Martha has directions and a gorgeous display at her place.

Posted in children's activities, crafts, decorations, holiday decorations, homemade valentines, kids crafts, party decorations, valentine's day crafts | 36 Comments »
January 31, 2007
I purchased this pan made by Chicago Metallic at William Sonoma last year. I love it!

I have used it over and over again. It made perfect desserts at my niece’s lunch and has been a hit every-time since. I baked these little cheesecakes today but mine are not cool enough to remove from the pans. If you want a closer look here is a picture from the box.

I plan on deocrating mine and the plate for Valentine’s day—I’ll show you later!
The recipe on the back of the box it delish. I have adapted it slightly. Here is the recipe I use.
Mini Heart Chocolate Cheesecakes
You will need
Crust
½ Cup chocolate graham cracker crumbs
(1 pack of the 3 pack box yields 1 cup)
2 Tbs butter, melted
1 ½ Tbs sugar
1 pinch of salt
Filling
¾ Cup semi-sweet chocolate chips
8 oz. Cream cheese (softened)
½ Cup sugar
2 eggs
½ Cup sour cream
½ tsp. Vanilla extract
Have all ingredients at room temperature. Preheat oven to 325 degrees. Lightly spray pan, especially the sides. You probably could make these in a mini-muffin pan—-but this pan has removable heart disc bottoms that make it a breeze to remove the cheesecakes.
To make the crusts, combine cookie crumbs, butter, sugar and salt and mix until well blended. Divide the mixture between the hearts. Press evenly into the bottom of each well. It is about a tablespoon of mixture in each well. Bake crusts for 10 minutes. Cool completely on a wire rack.
Reduce oven temperature to 275 degrees.
Melt chocolate (I use the microwave). I process in my food processor or with a mixer the cream cheese and sugar until smooth—-stop occasionally to scrape down the sides of the bowl. Add the sour cream and vanilla and blend. Add the eggs one at a time blending after each egg. Add the melted chocolate and beat until completely blended—again stopping to scrape down the sides. Pour batter into the crusts. I fill completely to the top.
Bake until the filling is set, 18-20 minutes. I place a pan of water in the oven while baking. I allow the cheesecakes to set in the turned off oven with the door open a bit for about 30 minutes after baking is complete. I then allow them to cool on the counter for another 30 or so minutes. I think the slower cooling helps prevent cracks. Cover and refrigerate for at least 3 hours before unmolding. These freeze beautifully!
I decorate the tops with a little chocolate ganache. Heat 1/3 cup heavy cream (don’t substitute any thing less!), 1 T butter, and 1 T sugar. Bring to a boil, stirring constantly. Pour boiling cream mixture over 3 ounces (about 1/4 cup) semi-sweet chocolate chips. Allow to stand for 3-4 minutes. Stir until smooth. Pour onto tops of cheesecakes and smooth evenly.
I only see the round miniature cheesecake pan at William Sonoma this year. I have found the heart one here and here.
Enjoy!
Posted in homemade valentines, party ideas, recipes, valentines | 10 Comments »
January 25, 2007
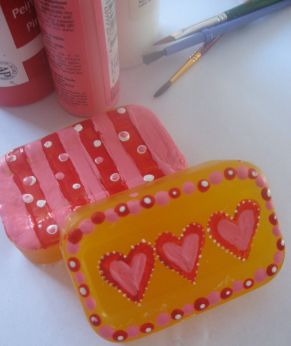
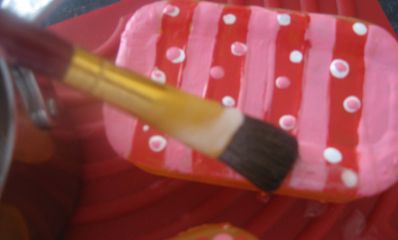
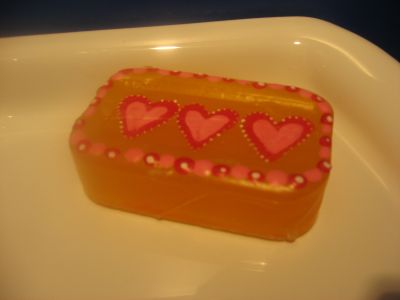
Even the bathroom needs a little holiday cheer!

Paint Glycerin soap with acrylic paint. One side of the soap needs to be non-imprinted, so you have a nice area to paint on.

Melt paraffin in a double boiler situation. I used a metal measuring cup set in a pan of water. An old food can could also be used. Wax is highly flammable so it is best to melt it in water. DO NOT allow any of the water to get into the wax!

Brush a thin coat of melted wax over your painting. Do not paint the sides or bottom of your soap. The wax must be very hot to give a clear coat. It is probably best for an adult to do this step while wax is still at the stove so it remains very hot.


When you use your soap the wax will protect your paintings.

Posted in children's activities, crafts, decorations, holiday decorations, homemade valentines, kids crafts, valentine's day crafts, valentines | 6 Comments »
January 23, 2007
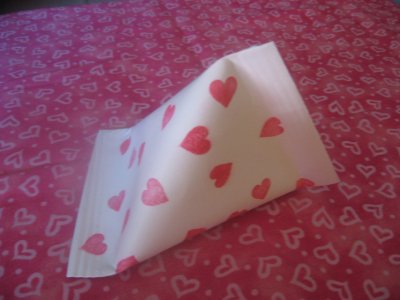
I learned how to make this cute envelope pocket from Jessica Samuels, a Stampin’ Up consultant. Take one legal size plain or decorated envelope and measure over 2 3/8 inches from the edge of the envelope on each side. see red line

Cut this triangular area away from the flap of the envelope.

If you did not start with a decorated envelope, stamp or decorate over the entire envelope, front and back. I left lining area plain.


Fold both sides of the envelope to the center. I think it is easier for children if you place a piece of cardboard in the middle to have a guide for folding. My cardboard measured 4 3/8 ” X 4 1/8″.
Remove cardboard and place 1/2 of a hole punch about 1 ” down (depending on the length of your flap. It should be about at the center of the side of the flap when flap is folded down YIKES that is hard to explain) from the flap fold on each side.

Run ribbon through the holes on the front inside out to the back of the envelope. I used about 24″ of ribbon.
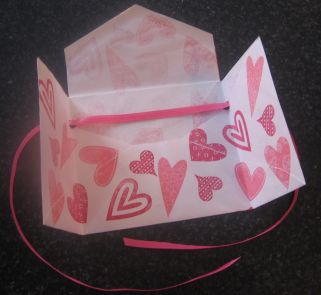
Place candy or a card in your refashioned envelope.

Fold in the sides, then fold down the flap and tie your ribbon.

It’s not long until Valentine’s Day!
Posted in children's activities, crafts, homemade valentines, kids crafts, party favors, valentine's day crafts, valentines | 15 Comments »
January 19, 2007
Last Wednesday we made homemade lollipops. While the kids can’t participate in every step, there is plenty to do. LorAnn’s makes the most ingenious Pencil Pops. This little piece of plastic molds in the lollipop in place of sucker sticks. When the lollipop is finished it then will fit onto a pencil. If you want to use lollipop molds like we did you must make sure to buy the molds that have a space made for the pencil pop. We used 3 sheets of molds, yielding 15 lollipops.
Old Fashioned Lollipops
2 cups sugar
2/3 cup light corn syrup
¾ cup water
1 tsp Flavoring (we used LorAnn)
¼ tsp Liquid Food Coloring
Candy Thermometer
Lightly spray molds with cooking spray and insert pencil pops into your molds.


In large saucepan, mix together sugar, corn syrup and water. Stir over medium heat until sugar dissolves. Bring mixture to a boil without stirring. This syrup gets very hot. Children must watch the next steps from afar!

When syrup temperature reaches 260°F, add the coloring. DO NOT STIR; boiling will incorporate the coloring into the syrup.

Remove from heat at 300°. Watch closely from 260° to 300°, the temperature will rise quickly. Remove from heat. When boiling has stopped, stir in flavoring. I then CAREFULLY pour the mixture into a heat proof ceramic pitcher or glass batter bowl. This makes it easy to pour into the molds. It also allows you to be able to slightly reheat the mixture in the microwave if it cools too quickly. Immediately pour syrup into the molds.

After lollipops have cooled they may be removed from the molds. Stick pencil in pencil pop.

We wrapped with lollipop bags and ribbons.

Enjoy! Have a great weekend!
Posted in children's activities, homemade valentines, kids crafts, party favors, party ideas, recipes, valentine's day crafts, valentines | 12 Comments »
January 18, 2007
We made these sour cream container look alikes last year for Valentine’s Day. This simple design allows for lots of creativity. We used white cardstock that we stamped with hearts, but colored papers, paper with your writing and drawings or other decorative papers or materials (wallpaper etc.) could be used.
We started with half of a sheet of cardstock. We then stamped hearts on the paper.

Put double sided tape down the short side of the paper. Then roll the paper up to make a tube.


Gently squeeze the tube on one end. Place a piece of double sided tape at the end on the inside so when you squeeze the end all the way shut it will stick. Squeeze the end shut. Take a paper crimper (This thing is a HUGE hit with my kids—well worth the bucks!) and crimp the end closed. We crimp enough into the container that we have 4 or 5 crimping lines.


Fill the container with treats and or some trinkets. Now gently squeeze the other end in the OPPOSITE direction. Put tape along the inside at the end and then crimp shut. The crimping really makes it look just like a sour cream container.


Posted in children's activities, crafts, homemade valentines, kids crafts, valentine's day crafts, valentines | 15 Comments »


