Archive for the ‘sewing’ Category

Lunch time!

May 8, 2008

A group of friends and I share a tradition of taking our kids’ teachers lunch during teacher appreciation week. We tally up the amount of lunches we need, notify our teachers and then gather in the morning to assemble the lunches. One friend makes delicious chicken salad, another brings croissants for the sandwiches, one brings fruit, another makes wonderful pasta salad and another awesome brownies. I take care of the packaging. Last year I made these sacks. This year I made oilcloth lunch sacks.

I first made a pattern out of cardboard measuring 15 x 12. Cut a 2 1/2 inch square out of each bottom corner.

Take two pieces of oilcloth right sides together and draw around your template. Cut out. I used small clothes pins to hold the pieces together.

I used pinking shears to cut across the top (very optional- I thought it gave the edge a finished look)

Sew down each side and across the bottom. I used a stitch length of 5 and 1/4 inch seams on the entire bag. My machine handled the oilcloth beautifully, but If you have any troubles, Sew Mama Sew has a wonderful article on sewing with oilcloth.

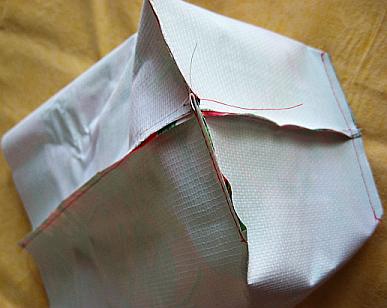
Fold in bottom of bag bringing bottom seam and side seam together

Pin bag bottom to bag side with clips

Sew across on each side

Turn bag right side out and fold in top of bag about 1/2″ and then top stitch

Measure about 2 1/2 inches from middle side seam on all four corners, finger press, clip with clothes pins

Top-stitch closely to the corner fold on each of the four sides

Finished!

What’s for lunch?

April 8, 2008

How about a ham, roast beef and Swiss pita with tomato and lettuce and a bag of chips?

 felt-pita-and-chips.jpg

This little lunch is for my niece’s birthday.  I could easily become addicted to making felt food. 

Lucky Shamrocks

March 4, 2008

My 11 year old boy made these cool hanging felt shamrocks for our window. (He wanted me to make sure that you know he was VERY bored and needed something to do and he got to use the sewing machine —stressing the MACHINE part, so it was all good)

shamrock.jpg

We took two layers of felt and cut out a shamrock shape.  My crafty boy used a sewing machine to beautifully stitch the layers together and also stiched  in a ribbon at the top.  He added a few beads on the ribbon and now they our hanging in our window—hopefully bringing us lots of luck!  If you need some luck, here are the shamrock shapes we used.

Stuffed

January 18, 2008

Our pal Elle came today and she made the most adorable stuffed butterfly and “puppy.”

fabric-crayons-007.jpg

These fabric crayons are great to have on hand to pull out when a quick and entertaining crafted is needed. You can use regular crayons directly on fabric but I really like using the paper. I think it is much less intimidating for children.

fabric-crayons-001.jpg

First Elle colored these pictures on plain white paper. You need to color hard. Keep the drawing large with simple edges. It is important to color on only ONE side of the paper. If your child feels that she made a “mistake” give them another sheet. Our “mistakes” bled through when we ironed. Remind them that their drawings will be reversed so they must write backwards if they are using letters.

fabric-crayon-drawings.jpg

Iron the drawings onto synthetic or poly/cotton blended fabric (I think my colors would have been more vibrant if I had done this, but I only had white muslin on hand) by placing the drawing face down on right side of fabric . Sandwich a layer of plain white paper on the top and on the bottom to keep from leaving crayon on your iron and ironing board. With iron on cotton setting, iron over design until the image is seen through the back of the paper.

Place the design onto another piece of fabric right sides together and stitch around the design, leaving a small opening for the stuffing. I think this is much easier than cutting out the design and then sewing.

fabric-crayons-003.jpg

Cut out the creatures, clip all corners and curves

fabric-crayons-005.jpg

Turn inside out and stuff

fabric-crayons-006.jpg

Slip stitch the opening closed and you have some wonderful creations.

fabric-crayons-dog.jpg

Hooded Towel Tutorial

November 29, 2007

I made this hooded towel for Christmas for my little girl. It is a really simple and quick project made from 1 bath towel and 1/2 of a hand towel.

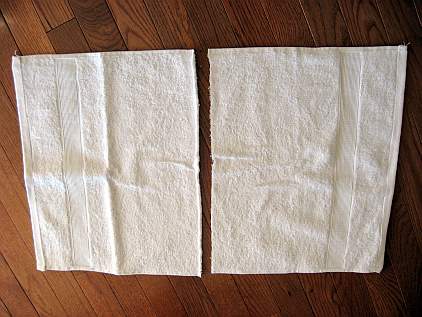
Cut your hand towel in half

hooded-towel-1.jpg

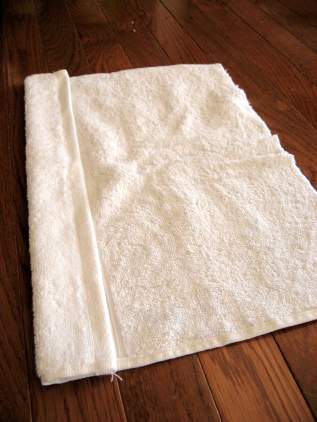
Fold over the finished edge of the hand towel. I folded down just past the ribbing. You want to have about 10 1/2 inches in finished length. Stitch down the edge.

hooded-towel-2.jpg

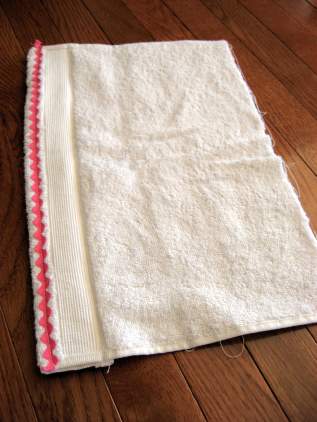
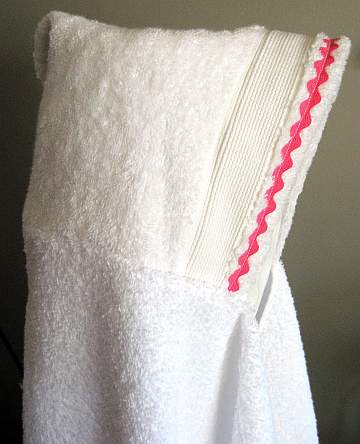
I stitched a little ric -rac to the front.

hooded-towel-3.jpg

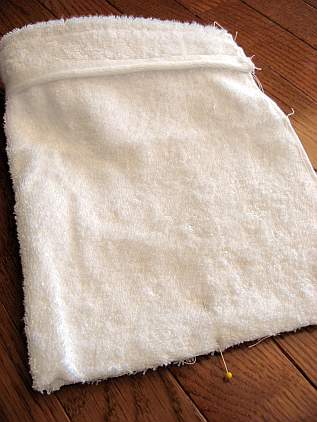
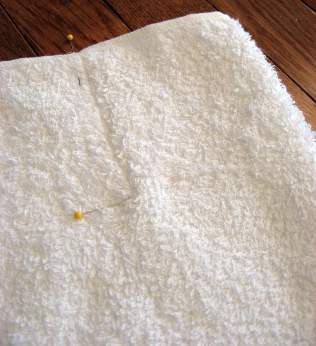
Fold hand towel in half right sides together, find the middle of the side and mark with a pin.

hooded-towel-5.jpg

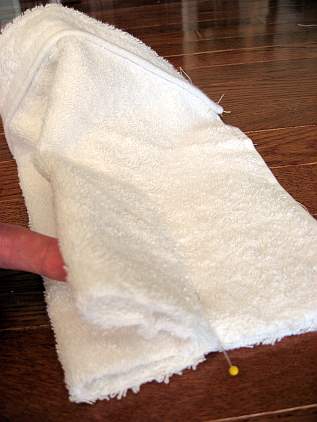
Bring the folded edge into the middle. You may have to remove the pin while you adjust the towel.

hooded-towel-6.jpg

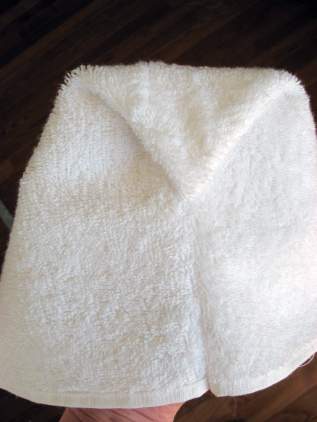
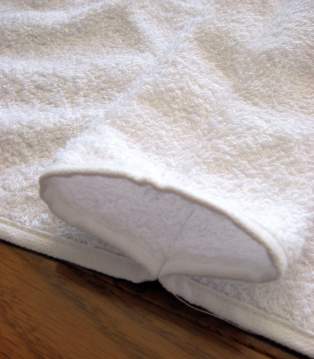
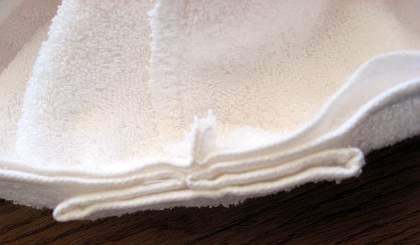
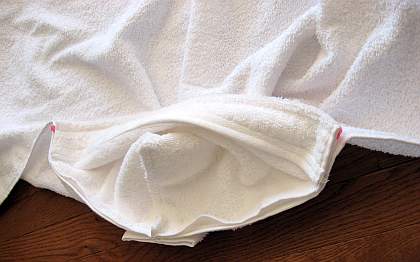
Stitch across the bottom edge making sure you catch all layers of the pleat. When finished stitching, zig zag or overcast your seam to prevent raveling. When you are finished the right side will look like this.

hooded-towel-7.jpg

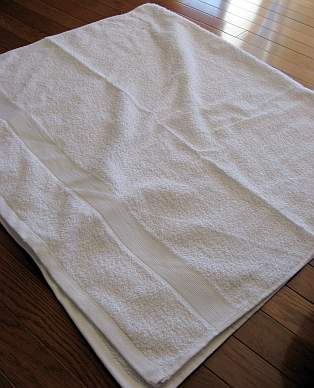
Fold the bath towel in half, right sides together.

hooded-towel-8.jpg

Measure over 3-4 inches from the fold and 3-4 inches down from the top and stitch.

hooded-towel-9.jpg

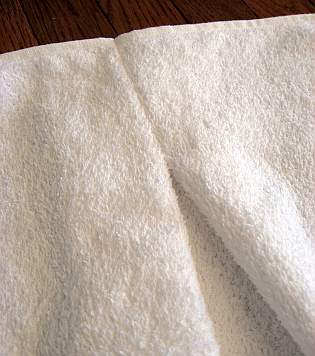
Open bath towel flat and open and flatten the tuck. You can baste across the tuck if you want.

hooded-towel-10.jpg

The front of the bath towel will look like this when finished

hooded-towel-11.jpg

With right sides together, line up center of bath towel and center of hood.

hooded-towel-12.jpg

Pin hood to bath towel. You will stitch from the side edge of the hood across to the other side. Be sure to back stitch when starting and stopping to reinforce the seam. I stitched close to the edge along the inside of the towel’s finished edge. (I have not stitched in the following photo)

hooded-towel-13.jpg

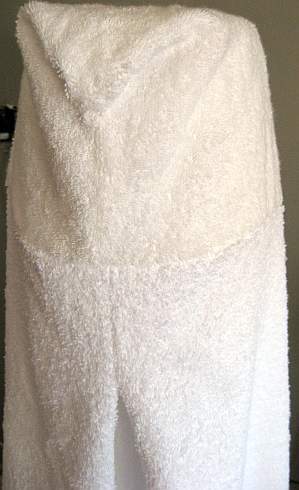
The finished towel looks like this

hooded-towel-14.jpg

hooded-towel-15.jpg

Now that it is finished I am wishing I had added another row of ric- rac or that I could find the darling pink towel with rainbow ribbing I originally purchased for this project!

Puppy Love

September 5, 2007

You can scamper on over to Anna Maria Horner and get yourself some Puppy Love. She has a free download for this darling puppy applique.

pink-puppy-tote.jpg

puppy-tote-close-up.jpg

To make this tote I cut 2 pieces 12″ X 14″ , 2 lining pieces 12″ X 14″ , 1 piece sew-in interfacing 12″X14″ , 1 piece for strap 8″ X 4″ (I used lining fabric for this), 1 piece for strap 24″ X 4″. First I printed out the puppy applique. Using Anna’s instructions I cut out the puppy using black faux suede. Place the front piece of fabric over the piece of interfacing, position the puppy on the right side of fabric. I sewed around the entire puppy with a machine blanket stitch. I attached a bow for the puppy’s collar. To make your straps fold fabric in half, press, then open flat. Fold each edge into the center, press, then fold in half. Stitch close to the edge down each side of strap. The bag goes together using Colorfool’s Tote Tutorial. I used a 1/2″ seam allowance on my tote. Notice I used two different sized straps. The shorter strap fits around the larger strap. The shorter strap keeps the bag closed while you carry the tote with the longer strap. When attaching the straps, place the shorter strap two inches in from each side edge on the back side of the tote (I made raw edge (end) of straps flush with raw edge of tote –on the tutorial they look like they stick out about an inch). Each end of the longer strap is placed three inches over from each side edge of the front of the tote.

This tote is for Elle, the most puppy loving little girl we know!

OH MY

June 21, 2007

Look at these wonderful blankets.  I will be posting better pictures after they have all been collected.  This is only a small portion!  As of today I have over 300.  Did you hear that?  Thanks to your generosity more than 300 orphans will receive comfort from you!

comfort-blankets-3.jpg

Thank You for your help

June 17, 2007

The comfort blankets have been flooding my mailbox.

comfort-blankets-2.jpg

I have collected almost 100 with more on the way, WOW!  If you haven’t mailed yours and were planning on participating, please try to get them in the mail on Monday.  I am hoping to deliver all the blankets by the end of the week.  Once they are all collected I will share  photos of these beautiful blankets with you—-they are fabulous.  This has been a truly amazing experience.  I have been touched by your generosity.  The blankets have been creative and crafted so wonderfully!  Thank you to all of you that took the time to share your talents to bless one (or more) of the babies.  Thank you doesn’t seem enough!

Could you lend me a hand?

May 31, 2007

arthurs-letter.jpg

My 17 year old nephew will travel this summer to China to work in three orphanages. I thought it would be special for him to have gifts to distribute to the children. I believe this simple gesture can bring joy to these little ones and share kindness and maybe offer hope.

I talked with Hope’s Heart, the organization he is going with and they said they could use 200 small security blankets. I was totally inspired by what Carol did for the orphans with Made for China. I am also amazed at all of the skirts Randi was able to collect for Sewing Seeds. This was all made possible by your generosity and big hearts. So, if you could spare just a little more time and fabric I would truly appreciate help making these blankets.

They need to be about 12″ X 12″ in size and made from something soft or silky to bring comfort to the children. Carol has a tutorial on how she made her Linus blankets.

I took two pieces of fabric 12 1/2″ X 12 1/2″ in size, one a flannel and one a ‘minky’ type fabric.

blanket-1.jpg

With right sides together I sewed around the edge with a 1/4 inch seam leaving about a 3″ opening.

blanket-2.jpg

Turn right side out and then top stitch around the edge—making sure to close the opening.

blanket-3.jpg

These little blankets can be made as simply as the one above or could have a ruffle, small tags sticking out from the edges to provide tactile stimulation or bound with bias tape or satin blanket binding. These blankets can be made from scraps sewn together.

blanket-4.jpg

I was lucky enough to have my friend’s daughter help me sew blankets today. She made the darling patchwork one above and helped with the others. She is so very sweet and talented!

courtney.jpg

If you are able to help with this project please leave a comment and I will send you the mailing address and more details. Please consider mentioning this project to your friends or even linking to this post on your blog. Blankets will need to be mailed by the end of June.

THANK YOU!

By the way if you check out the website for Hope’s Heart you will see that there are many things we can do. Lillie is my niece (sister of my nephew that is going this summer).

For Catherine

May 24, 2007

My dearest and oldest friend left today for Cleveland, where her mother will be having open heart surgery tomorrow. I wish I was there with her to keep her company. I pray for a successful surgery and safe return home for their entire family. I could never be able explain how much I care for Catherine. We have been friends since the third grade and somehow my emotions are tied to hers. When things are really wrong I can tell, no matter how many thousands of miles have separated us. So today as I know she is in a strange place and filled with worry, I am so blue. I am wishing this was all behind her and we were laughing and having a popcorn combo at Target.

To keep her mind busy while waiting at the hospital I made her a little care package. She would like to learn to crochet so I set her up with books, needles, yarn and instructions (and in-case it is just too frustrating—magazines, snacks, notebook, some Irish Cream for her coffee and some Tylenol!). I used my crayon roll tutorial to make a holder for her crochet hooks. I sewed 1″ and 1/2″ pockets for the hooks. I added a little pocket on the bottom corner for yarn needles.

crochet-hook-holder-for-catherine.jpg

She can keep everything in this tote. I found Colorfool’s Tutorial (for making the handles and tote) and Super Eggplant”s Tutorial (for the construction of the tote) very helpful. It is totally reversible.

tote-for-catherine.jpg
So Cat, I hope it brings you comfort knowing that you are in my thoughts and prayers. I thank you so much for all you do for me, especially the joy you bring to my life. I am thankful for your extreme generosity and kindness. I admire you as a person and a mom! I love your desire to grow and evolve! My parents always said be careful who you hang out with because you become them —– I am glad that since the third grade I have hung out with you. You are truly wonderful! See you soon!

On a roll

April 25, 2007

crayon-roll-1.jpg

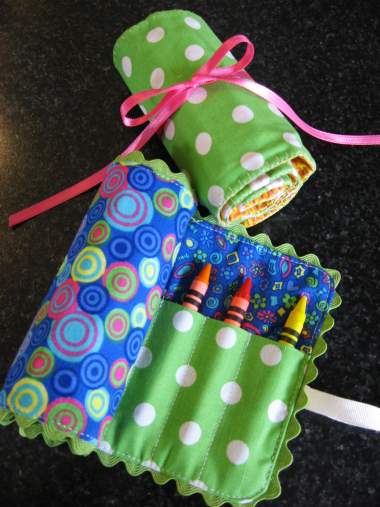
To welcome my new niece home from China on Sunday, I whipped up a crayon roll. I wasn’t able to give it to her in person but my mom said she was mesmerized by all of the crayons and how they slip in their own pocket.

faith.jpg

I see these crayon “cozies” holders everywhere and they are easy to make. If you don’t want to have to figure out the measurements, here is a tutorial on how I made mine.

I used two pieces of fabric 5 X 16 1/2 inches (for the outside and inside), one 6 X 16 1/2 inch piece of fabric folded in half lengthwise and pressed (for the pocket), one piece of lightweight fusible interfacing 5 X 16 1/2 inches, one package of ric rac trim, 30 inches of ribbon, one package of 16 count crayons.

crayon-roll-2.jpg

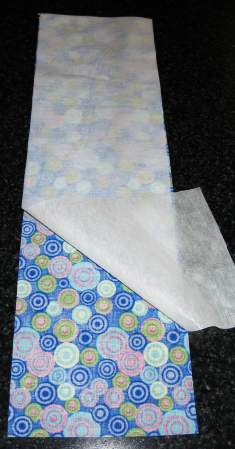
Iron the interfacing to the wrong side of the 5 X 16 1/2 piece of fabric that you want to be on the inside.

crayon-roll-3.jpg

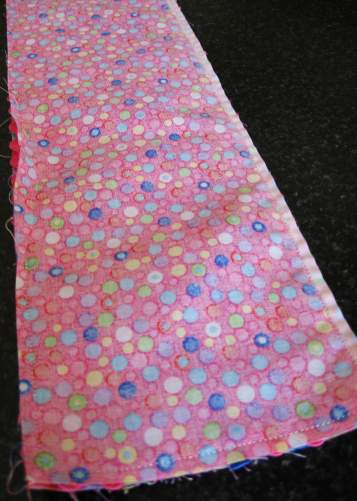
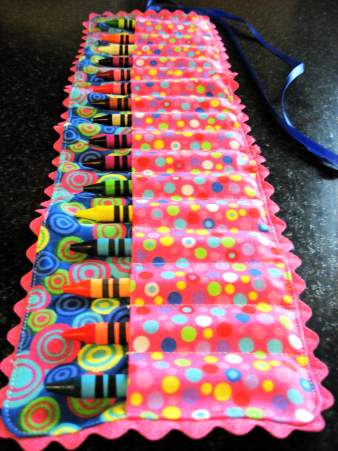
Line up the bottom edges of the folded piece and the piece with interfacing, pin together. Starting over from the edge 1 1/4 inches sew lines parallel with the edge starting from the top of the crayon pocket, back-stitching at the top to reinforce. Sew the lines one inch apart across the pocket. You will have 1 1/4 inches on each side.

crayon-roll-4.jpg

If you want to use ric rac, pin it around the edge as shown. Fold the ribbon in half and pin it on the edge. On the one I didn’t use ric rac I did a blanket stitch around the edge when finished.

crayon-roll-5.jpg

Pin remaining piece of 5 X 16 1/2 inch fabric right sides together with the pocket piece. Sew around edges with 1/4 inch seam. Leave about 3 inches across bottom for turning.

crayon-roll-6.jpg

Trim corners, turn, press and top stitch being careful to catch all layers of the opening to close.

crayon-roll-8.jpg

crayon-roll-7.jpg

Welcome home Faith! We are so happy to have you join our family! How very lucky we are indeed to have you!

So in honor of my new niece Faith, an entry “crayon cozy” to this months Whiplash.

127394092_591ed1b07a_o.gif

Dishtowel Aprons

March 20, 2007

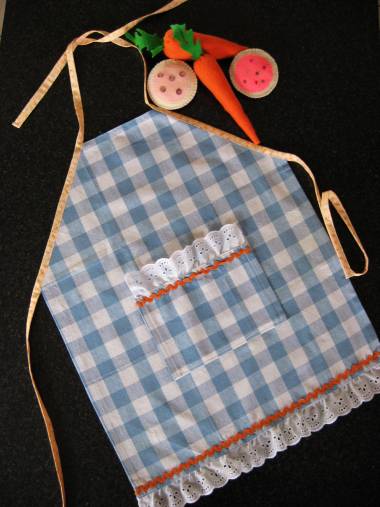
Randi from i have to say has a great dishtowel apron tutorial. I wanted to make mine for my niece who is 3 (It also fit my friend’s little girl who is 4 nicely with room for growth). I followed Randi’s tutorial instructions but changed the measurements to make the apron smaller. I first cut off 6 inches from one end of my Martha Stewart 18×28 towel. I used part of what I cut off the end to make a front pocket. From the top of the towel I measured over 6 inches from the side edge and then from the top down the side 7 inches and cut this triangle away from each side. I was unsure of size so instead of leaving 15 inches of bias tape for the neck hole I allowed a15 inch piece on each side to it can be tied. I used a 1 inch bias tape maker and made my own bias tape so I could have a print on the bias tape.

gracies-apron.jpg

I also made one for my two year old daughter.

bellas-apron.jpg

For her size I cut off 10 inches from one end of the towel and then used my same measurements —-over 6 inches along the top of the towel and down the side 7 inches on each side. I used purchased double fold extra wide bias tape and allowed 18 inches for the ties and 15 inches for the neck hole.

bella-cooking.jpg

I also gave my niece some felt cookies and carrots to go along with her apron. I could become addicted to making felt food. Thanks Katie for giving me the idea! My little girl loves playing with ours.

felt-cookies-and-carrots.jpg

Mini Swap

February 18, 2007

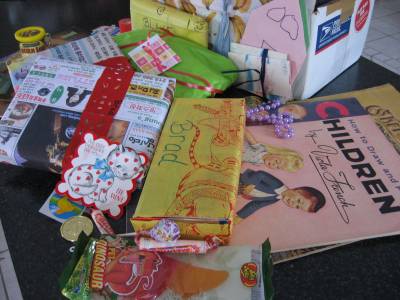
We participated in MollyCoddle’s mini swap—what fun we had. We sent off a box of wrapped goodies.

our-swap-package-wrapped.jpg

We swapped with a little boy named Lincoln. His mom, Katie, told us he loves robots and trains. We made him personalized notepads and bookplates. We drew the pictures and had Office Max do the rest.

lincolns-bookplate-and-notepads-2.jpg

I made him a special case to carry a drawing pad and some twist-up crayons. I used the pattern found on Craft Apple—except I made 8 pockets instead of 6 for the crayons. Later I will post a tutorial for a slightly different style.  We also sent a crochet treasure bag (I will post a picture later) and a personalized denim bag.

lincolns-drawing-pad-holder.jpg

We received the most wonderful box of loot.

lincolns-swap-package-to-us-wrapped.jpg

The boys each received personalized scrapbooks—all they need to do is add their own pictures. They also made us a holder for twist up crayons. We received some beautiful vintage books and Bella was totally spoiled with a handmade apron, carrots, tomatoes and a cookie. It is just the cutest food I have seen. I will be making these for some little girls I know. She also made Bella the sweetest collage for her room.

swap-package-from-lincoln.jpg

Thanks Katie and Lincoln!

Bag Swap

February 15, 2007

I participated in the Tote Bag Swap(I will add the Flicker link when it is up incase you are looking for bag inspiration) at One Hour Craft.  Now that my partner has received her bag I can share.  I received a large brown roomy tote.  The fabric is so soft.  A perfect tote for carrying around a project.  My partner went above and beyond and totally spoiled me with tea, chocolate and lotions to pamper my feet! Her mother even knit me a wonderful scarf!

totebag-swap.jpg

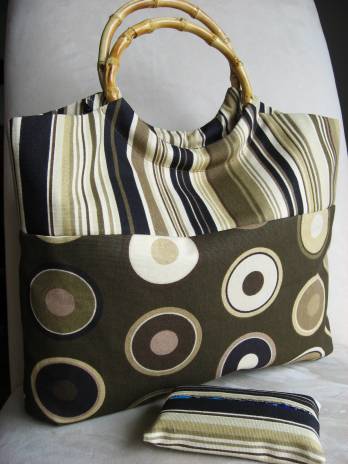
I sent this tote —

bag-3.jpg

with a matching tissue holder.

The bag was made from Simplicity pattern 4670 view C. 

bag-pattern.jpg

It was a super easy pattern and went together very quickly.   My only problem was finding the right sized handles—I couldn’t so those are 6″.  If you want to make the bag the yardage given is for one fabric.  If you want to use two fabrics you will need a 1/2 yard for the top and 3/8 of a yard for the bottom.  The other yardage requirements were the same.

Do you have a tissue?

February 12, 2007

I ended up mailing my friend’s birthday present in the heart pouch I made and then went on to make 10 travel tissue holders.

heart-tissue-holder.jpg

I wrapped them like this.

heart-tissue-holder-pillow-box.jpg

I started with a template from here. It was too small so I had to enlarge it to fit the tissues. I would love to give you the template but my computer skills aren’t there yet—–just give me time and I will have some goodies for you. Really though, the pattern is simple and was easy to enlarge.

Pocket full of hearts

February 7, 2007

I was thinking about making these for some special teachers.  I would have to make about three more sets—so we will have to see if I have the steam.  If not I will give these to a friend.  They were very quick and easy!

heart-bag-and-tissue-holder.jpg

Twelve 22 has a great tutorial on how to make the little pouch.  Instructions for the tissue holder can be found at Bell Dia, a beautiful blog.  She has a wonderful tea cozy today.  I did adapt the instructions for the tissue holder.  I used Kleenex sized travel tissues which must be considerably smaller than what she used.  I found mine worked if I used fabric and lining each measuring 6 1/2 inches by 7 inches.  I used 1/4 seams throughout. The final seams at each end were less than 1/4 inch (a touch more than an 1/8 inch).  I also left the opening to turn on the long side —this kept me from having to whip it shut once turned, because it is hidden on the inside.